How To Setup Kubernetes Cluster Using Kubeadm on Amazon EC2


Siddharth Sabale

What is Kubeadm?
Kubeadm is an excellent tool to set up a working Kubernetes cluster in less time.
We can create a Kubernetes cluster without much complex configuration.
It is developed and maintained by the official Kubernetes community.
Kubeadm Setup Prerequisites
For the Kubeadm Kubernetes cluster setup, we need:
- Minimum two Ubuntu nodes [One master and one worker node]. You can have more worker nodes as per your requirement.
- The control pane [master-node] should have a minimum of 2vCPU and 2GB RAM.
- For the worker nodes, a minimum of 1vCPU and 2 GB RAM is recommended.
Kubeadm Port Prerequisites
For Control Plane:
| Protocol | Direction | Port Range | Purpose | Used by |
|---|---|---|---|---|
| TCP | Inbound | 6443 | Kubernetes API server | All |
| TCP | Inbound | 2379-2380 | etcd server client API | kube-apiserver, etcd |
| TCP | Inbound | 10250 | Kubelet API | Self, Control plane |
| TCP | Inbound | 10259 | kube-scheduler | Self |
| TCP | Inbound | 10257 | kube-controller-manager | Self |
For worker nodes:
| Protocol | Direction | Port Range | Purpose | Used By |
|---|---|---|---|---|
| TCP | Inbound | 10250 | Kubelet API | Self, Control plane |
| TCP | Inbound | 30000-32767 | NodePort Services | All |
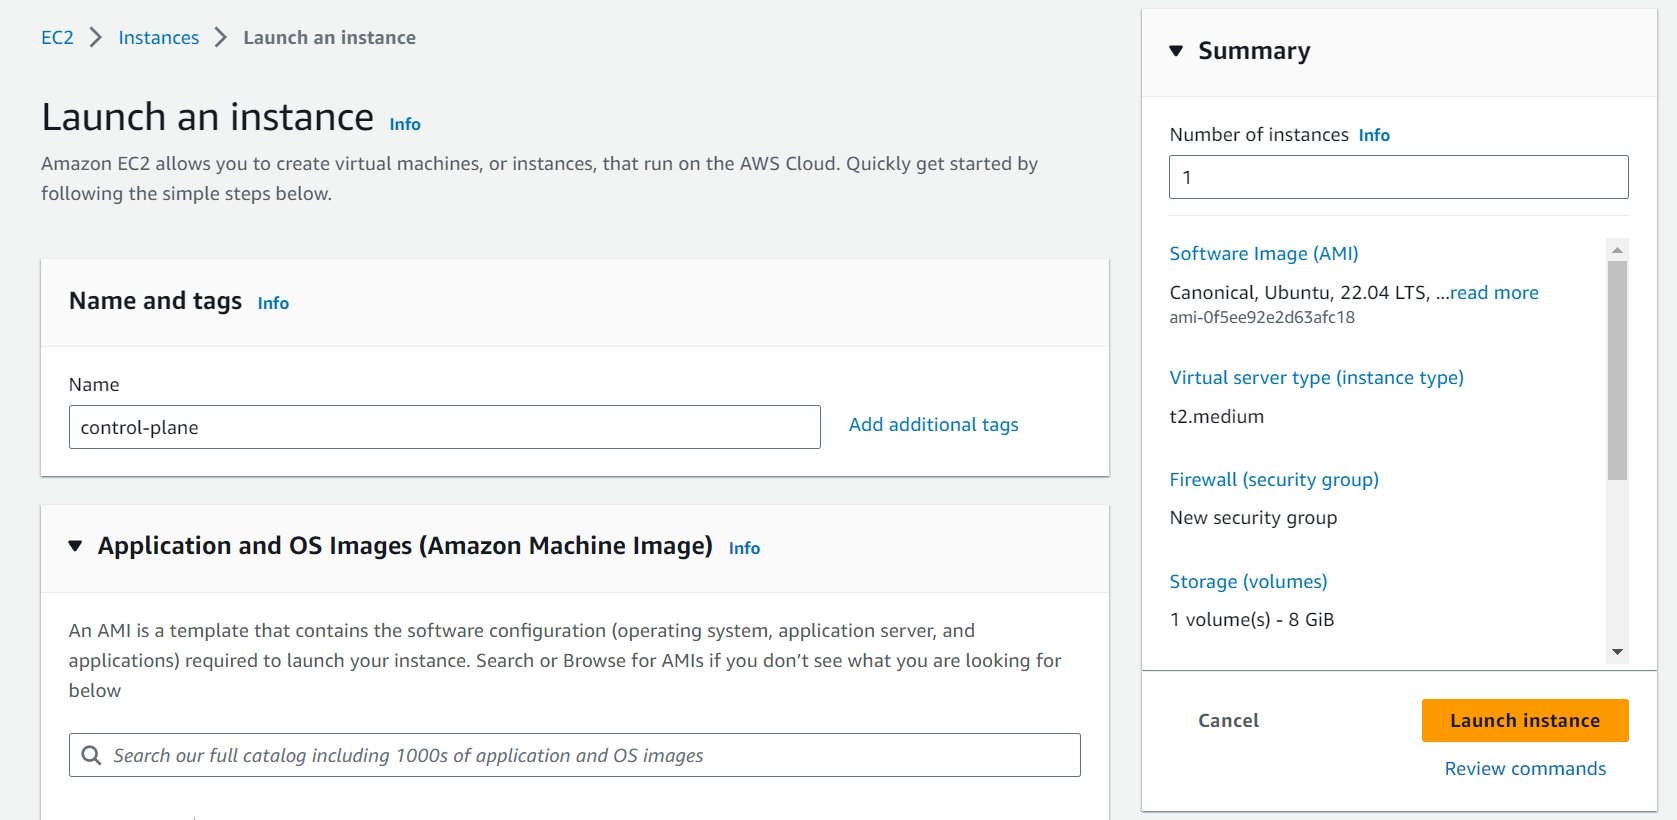
Go to your AWS Console > EC2 instances > Launch an instance.
Let's start by creating two EC2 [Ubuntu] instances, one for control-plane and the other as a worker node.
For each, we will use t2.medium, as the instances should satisfy the resource requirements.
Let's launch the instances.

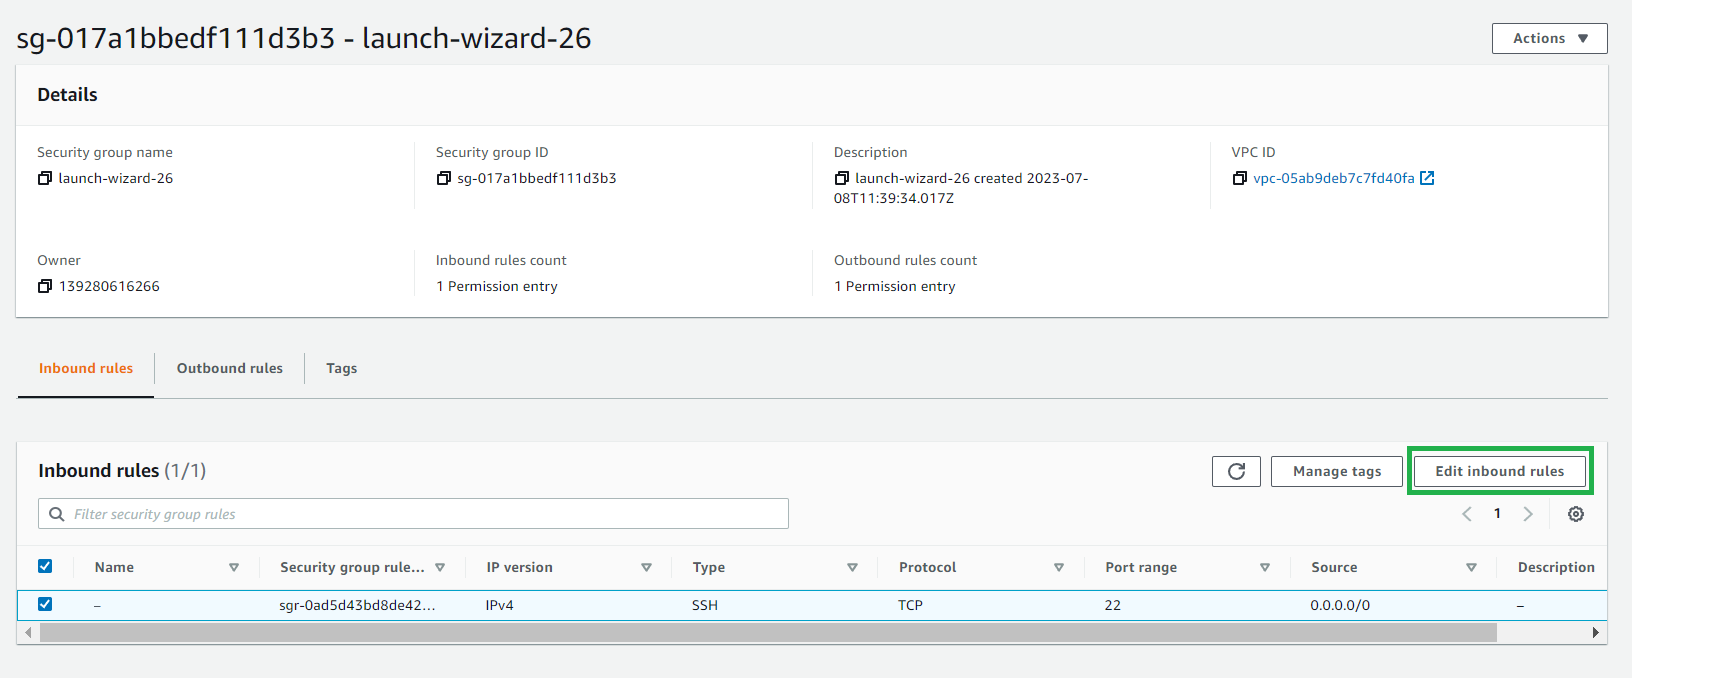
Let's satisfy the port requirements for control-plane:
Go to your control-plane instance, look for the security tab and click on security groups.

Then click on Edit Inbound rules:
Here, add the ports required for the control pane:
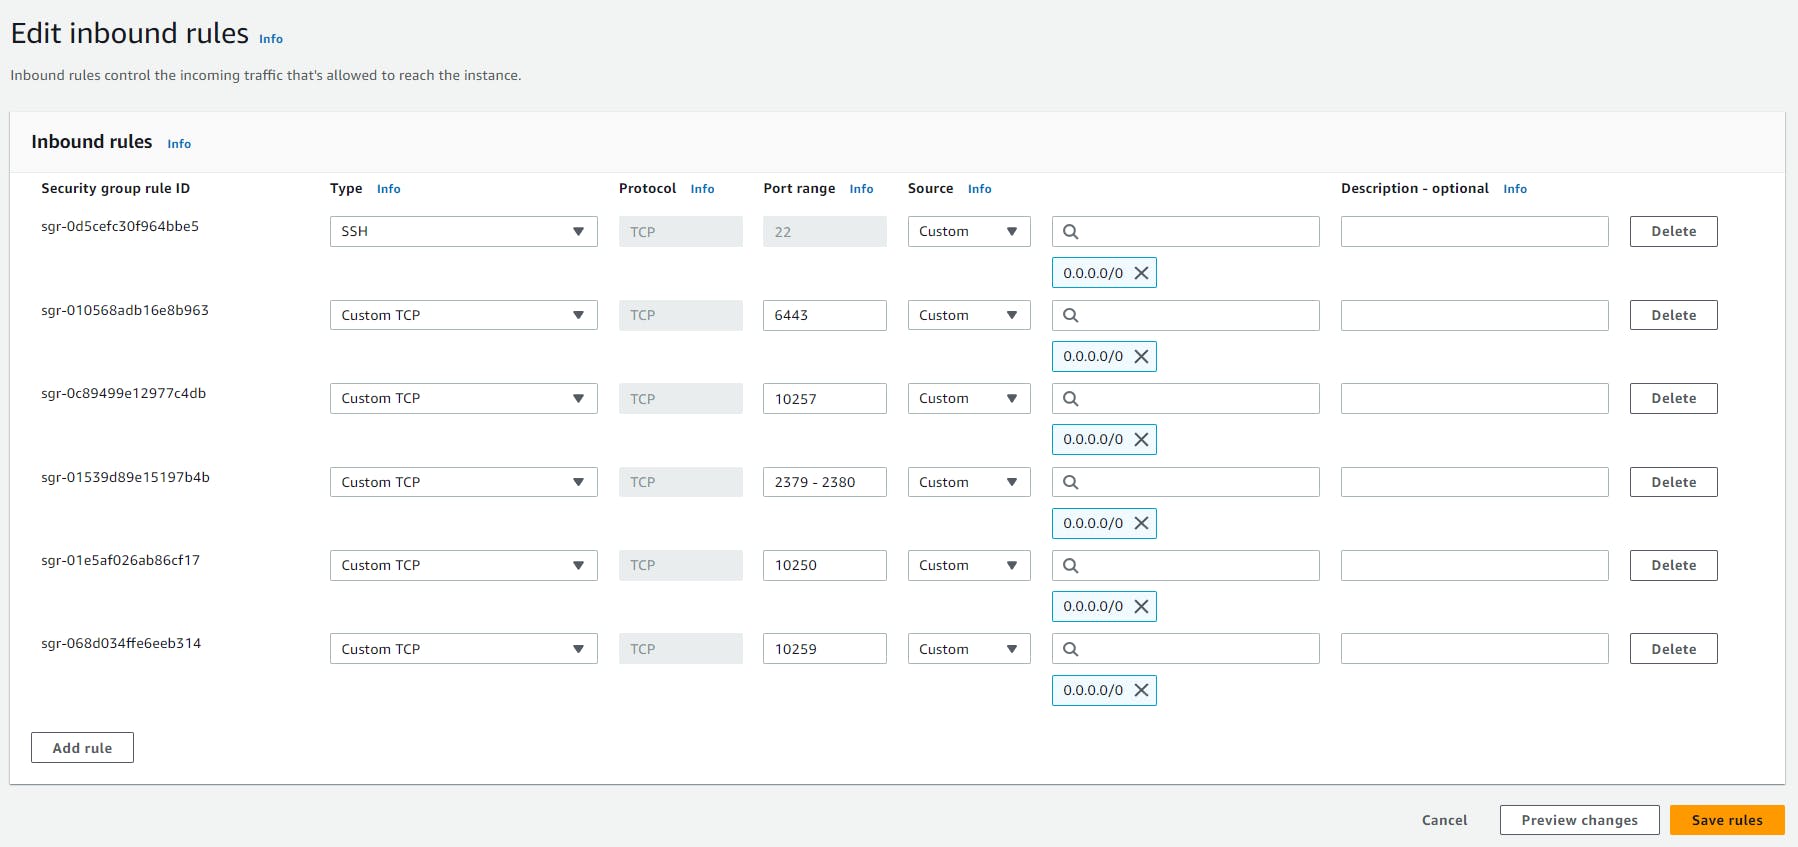
Then click Save rules.
Similarly, add the required ports for the worker nodes as well.
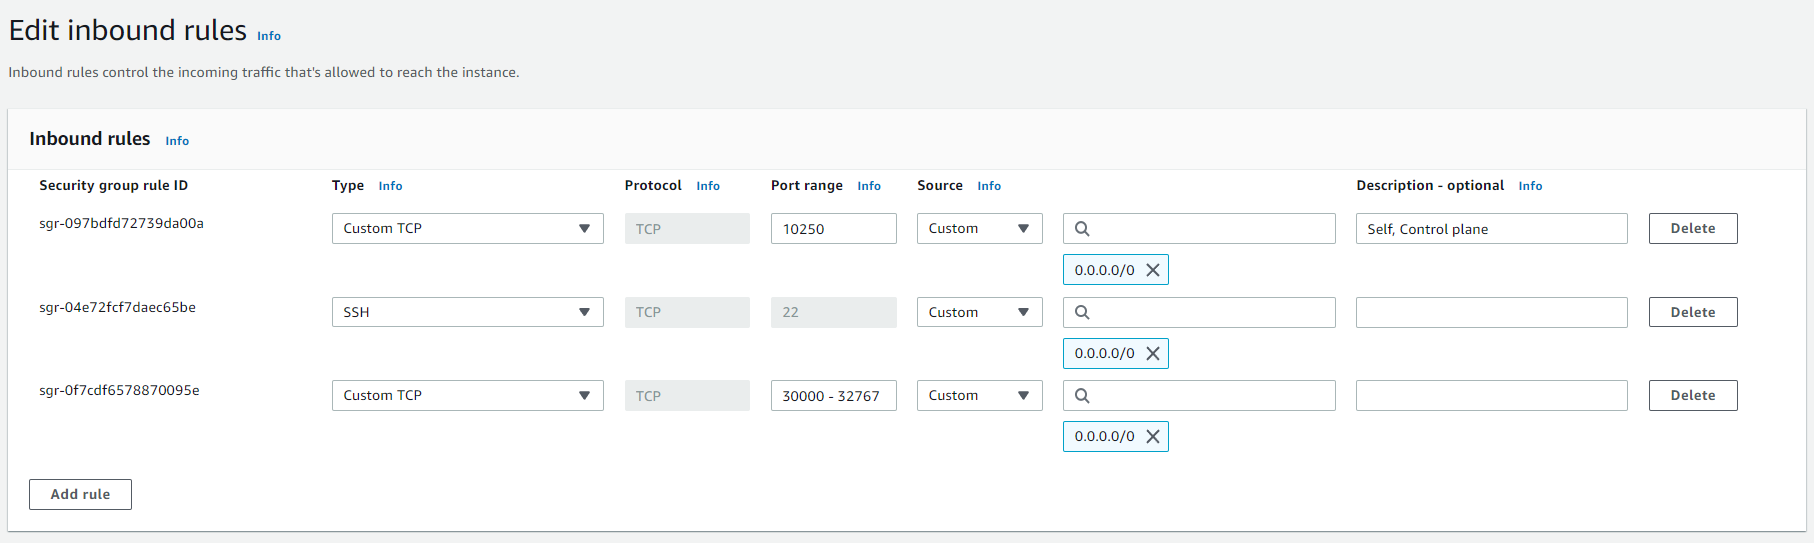
After editing the inbound rules, we are good to go with setting up our cluster.
Steps to setup Kubernetes cluster using kubeadm
- Install container runtime on all nodes- We will be using cri-o.
- Install Kubeadm, Kubelet, and Kubectl on all nodes.
- Initiate Kubeadm control plane configuration on the master node.
- Save the node join command with the token.
- Join the worker node to the master node [control plane] using the join command.
Let's start the setup, and execute the below commands on all the nodes
Enable iptables Bridged Traffic on all the Nodes
cat <<EOF | sudo tee /etc/modules-load.d/k8s.conf
overlay
br_netfilter
EOF

sudo modprobe overlay
sudo modprobe br_netfilter

# sysctl params required by setup, params persist across reboots
cat <<EOF | sudo tee /etc/sysctl.d/k8s.conf
net.bridge.bridge-nf-call-iptables  = 1
net.bridge.bridge-nf-call-ip6tables = 1
net.ipv4.ip_forward                 = 1
EOF

# Apply sysctl params without reboot
sudo sysctl --system
Disable swap on all the Nodes
sudo swapoff -a (crontab -l 2>/dev/null; echo "@reboot /sbin/swapoff -a") | crontab - || true
Install CRI-O Runtime On All The Nodes
cat <<EOF | sudo tee /etc/modules-load.d/crio.conf
overlay
br_netfilter
EOF

# Set up required sysctl params, these persist across reboots.
cat <<EOF | sudo tee /etc/sysctl.d/99-kubernetes-cri.conf
net.bridge.bridge-nf-call-iptables = 1
net.ipv4.ip_forward = 1
net.bridge.bridge-nf-call-ip6tables = 1
EOF
Execute the following commands to enable overlayFS & VxLan pod communication.
sudo modprobe overlay
sudo modprobe br_netfilter
Set up required sysctl params, these persist across reboots.
cat <<EOF | sudo tee /etc/sysctl.d/99-kubernetes-cri.conf
net.bridge.bridge-nf-call-iptables  = 1
net.ipv4.ip_forward                 = 1
net.bridge.bridge-nf-call-ip6tables = 1
EOF
Reload the parameters.
sudo sysctl --system
Enable cri-o repositories for version 1.23
OS="xUbuntu_22.04"

VERSION="1.23"

cat <<EOF | sudo tee /etc/apt/sources.list.d/devel:kubic:libcontainers:stable.list
deb https://download.opensuse.org/repositories/devel:/kubic:/libcontainers:/stable/$OS/ /
EOF
cat <<EOF | sudo tee /etc/apt/sources.list.d/devel:kubic:libcontainers:stable:cri-o:$VERSION.list
deb http://download.opensuse.org/repositories/devel:/kubic:/libcontainers:/stable:/cri-o:/$VERSION/$OS/ /
EOF
Add the gpg keys.
curl -L
https://download.opensuse.org/repositories/devel:kubic:libcontainers:stable:cri-o:$VERSION/$OS/Release.key | sudo apt-key --keyring /etc/apt/trusted.gpg.d/libcontainers.gpg add -
curl -L
https://download.opensuse.org/repositories/devel:/kubic:/libcontainers:/stable/$OS/Release.key | sudo apt-key --keyring /etc/apt/trusted.gpg.d/libcontainers.gpg add -
Update and install crio and crio-tools.
sudo apt-get update
sudo apt-get install cri-o cri-o-runc cri-tools -y
Reload the systemd configurations and enable cri-o.
sudo systemctl daemon-reload
sudo systemctl enable crio --now
Install Kubeadm & Kubelet & Kubectl on all Nodes
sudo apt-get update
sudo apt-get install -y apt-transport-https ca-certificates curl
Download the signing key
sudo curl -fsSL https://packages.cloud.google.com/apt/doc/apt-key.gpg | sudo gpg --dearmor -o /etc/apt/keyrings/kubernetes-archive-keyring.gpg
Add the GPG key and apt repository.
echo "deb [signed-by=/usr/share/keyrings/kubernetes-archive-keyring.gpg] https://apt.kubernetes.io/ kubernetes-xenial main" | sudo tee /etc/apt/sources.list.d/kubernetes.list
Update apt repo
sudo apt-get update -y
sudo apt update
apt-cache madison kubeadm | tac
curl -sSL https://packages.cloud.google.com/apt/doc/apt-key.gpg | sudo gpg --dearmor -o /usr/share/keyrings/kubernetes.gpg
echo "deb [signed-by=/usr/share/keyrings/kubernetes.gpg] https://apt.kubernetes.io/ kubernetes-xenial main" | sudo tee /etc/apt/sources.list.d/kubernetes.list
sudo apt update
Install kubelet, kubeadm, kubectl
sudo apt-get install -y kubelet=1.27.3-00 kubectl=1.27.3-00 kubeadm=1.27.3-00
Now, hold the versions for kubelet, kubeadm, kubectl
sudo apt-mark hold kubelet kubeadm kubectl
Add the node IP to KUBELET_EXTRA_ARGS.
sudo apt-get install -y jq
local_ip="$(ip --json a s | jq -r '.[] | if .ifname == "eth1" then .addr_info[] | if .family == "inet" then .local else empty end else empty end')"
cat > /etc/default/kubelet << EOF
KUBELET_EXTRA_ARGS=--node-ip=$local_ip
EOF
Initialize Kubeadm On Master Node To Setup Control Plane
Master Node With Public IP: If you are setting up a Kubeadm cluster on Cloud platforms and you need master Api server access over the Public IP of the master node server.
You can also use Private IP, but let's proceed with Public IP as we using AWS.
Set the following environment variables. The IPADDR variable will be automatically set to the server’s public IP using ifconfig.me curl call. You can also replace it with a public IP address.
IPADDR=$(curl ifconfig.me && echo "")
NODENAME=$(hostname -s)
POD_CIDR="192.168.0.0/16"
sudo kubeadm init --control-plane-endpoint=$IPADDR --apiserver-cert-extra-sans=$IPADDR --pod-network-cidr=$POD_CIDR --node-name $NODENAME --ignore-preflight-errors Swap
On a successful kubeadm initialization, you should get an output with kubeconfig file location and the join command with the token as shown below. Copy that and save it to the file. we will need it for joining the worker node to the master.
mkdir -p $HOME/.kube
sudo cp -i /etc/kubernetes/admin.conf $HOME/.kube/config
sudo chown $(id -u):$(id -g) $HOME/.kube/config
Now, verify the kubeconfig by executing the following kubectl command to list all the pods in the kube-system namespace.
kubectl get po -n kube-system
kubectl cluster-info
Join Worker Nodes To Kubernetes Master Node
We have set up cri-o, kubelet, and kubeadm utilities on the worker nodes as well.
Now, let’s join the worker node to the master node using the Kubeadm join command you have got in the output while setting up the master node.
If you missed copying the join command, execute the following command in the master node to recreate the token with the join command.
kubeadm token create --print-join-command
The command will look something like this,
sudo kubeadm join 10.128.0.37:6443
 --token j4eice.33vgvgyf5cxw4u8i \
 --discovery-token-ca-cert-hash
sha256:37f94469b58bcc8f26a4aa44441fb17196a585b37288f85e22475b00c36f1c61
# do not use this command, this is just for example
Execute this command on the worker node, if you get
"This node has joined the cluster"
The node was added to cluster 🎉
Now execute the kubectl command from the master node to check if the node is added to the master.
kubectl get nodes
If you get the nodes, Congratulations 🎉
You can see, in our output, the ROLE is <none> for the worker nodes. You can add a label to the worker node using the following command. Replace worker-node01 with the hostname of the worker node you want to label.
kubectl label node worker-node01 node-role.kubernetes.io/worker=worker
#please replace hostname
You can further add more nodes with the same join command.
Thank you!
Looking for reliable development partners? Check out our curated list of offshore software development companies.